The Complete Guide to Eat This Much
Introduction
We designed Eat This Much to combine established nutrition strategies with modern computer power - to save you time and energy. We have tools to decide how to eat, pick recipes that match your preferences, plan a whole day’s worth of meals, and track your intake, completely free! If you utilize our subscriber services, we provide tools to streamline everything from tracking and adjusting to grocery lists and leftovers, for entire weeks at a time.
Note Don't feel like you have to read this guide before getting started! We try to make our interface intuitive and add inline explanations when necessary. If you're stuck and have a specific question, come back to this guide.
Have a question? Here's what you can do:
- Browse the sections of this guide in the table of contents to the left, or use Ctrl + F or ⌘ + F to find something in the text.
- Refer to our knowledge base to search for specific terms, or search using the orange "Need help?" widget at the bottom right of this page (it has most of the same info as this guide).
- Check out our Tutorial Library for videos on how to use specific features (we've also inserted links to the videos throughout this guide).
- Send us an email. You can reach us at [email protected], and we try to reply within one business day.
There are three main sections in the app:
- Diet planner - This is where you generate suggestions for meals that fit your targets, and also log what you actually ate in case you don’t follow the plan.
- Groceries and Pantry - (Subscriber only feature) The grocery list will automatically update to show your next week’s meal plans. When you go grocery shopping and add foods to your pantry, the planner will automatically deduct ingredients from the pantry as you eat them.
- Settings - The planner can be extensively customized to match your nutritional needs, food tastes, and schedule.
Other sections:
- Stats and progress - view graphs of your nutrition intake over time (web only)
- Food browser - browse our database and sort by any nutrient we have (web only)
- Next meal - View your next untracked meal, soon with features to find alternative meals (mobile apps only)
Quick start guide to using the Generator
- The main way of interacting with the planner is to regenerate
 until the plan looks like something you want to follow. First regenerate the
day/week until you get a good baseline,
and then regenerate individual meals/foods to fine tune. On the
apps, swipe the food or meal to get a new suggestion, and on the website, hover the mouse over a
food to see the regenerate button.
until the plan looks like something you want to follow. First regenerate the
day/week until you get a good baseline,
and then regenerate individual meals/foods to fine tune. On the
apps, swipe the food or meal to get a new suggestion, and on the website, hover the mouse over a
food to see the regenerate button.
See Tutorial #3 in our Library for a full demonstration. - Favoriting
 a food will make it show up more often, while
blocking
a food will make it show up more often, while
blocking  it will make sure it never shows up again. The plans
will rarely be perfect the first time, but by favoriting and blocking foods, the process of
finding the perfect plan will get quicker over time.
it will make sure it never shows up again. The plans
will rarely be perfect the first time, but by favoriting and blocking foods, the process of
finding the perfect plan will get quicker over time.
See Tutorial #3 in our Library for a full demonstration. - You'll probably want to edit the Meal Types (like
 ). Tap/click
a meal's title to edit the Meal Type settings, or you can create new Meal Types. You can change
prep time, whether or not you can cook, meal size, and number of family members to make extra
servings for. We're working on adding some more settings here soon, like which cooking
appliances you have available.
). Tap/click
a meal's title to edit the Meal Type settings, or you can create new Meal Types. You can change
prep time, whether or not you can cook, meal size, and number of family members to make extra
servings for. We're working on adding some more settings here soon, like which cooking
appliances you have available.
See Tutorial #6 in our Library for a full demonstration. - If you already have some idea of what you want to eat,
 Recurring
Foods are the best way to have complete control over what meals the planner suggests.
If you add a handful of foods as Recurring Foods to a meal (set to show up "often"), edit that
Meal Type to "Only use recurring foods" and the generator will stick to that set of foods. Want
the same bowl of oatmeal for breakfast every day? Add it as a Recurring Food and set it to
"always". The generator will make sure the rest of your meals fit your nutrition goals for the
day.
Recurring
Foods are the best way to have complete control over what meals the planner suggests.
If you add a handful of foods as Recurring Foods to a meal (set to show up "often"), edit that
Meal Type to "Only use recurring foods" and the generator will stick to that set of foods. Want
the same bowl of oatmeal for breakfast every day? Add it as a Recurring Food and set it to
"always". The generator will make sure the rest of your meals fit your nutrition goals for the
day.
See Tutorial #4 in our Library for a full demonstration on recurring foods. - Want to change your nutrition targets? Tap or click the name of your Nutrition
Profile on the main planner page (named 'My nutrition targets' by default). There's a calculator
in the profile editor if you want to re-estimate your targets, or feel free to use any other
calculator on the internet, and then plug your numbers into the profile.
See Tutorial #2 in our Library for a full demonstration of changing your nutrition targets. - Did you skip a meal or eat something not on the plan? You can also use ETM as a calorie tracker. Simply delete the dishes you didn't eat, and add the ones you did from the Food Bank to keep your nutrition totals accurate.
How do I add/track custom dishes in the planner?
On the website, open the Food Bank sidebar with the "Search foods" button. Then just drag and drop dishes into your plan to add them.
In the mobile apps, tap the "+" icon in the top right corner of the planner page, and this will open the food search page. Once you select a food, tap the meal you want to add it to.
The Food Bank is also where you can create your own Custom Foods and Custom Recipes.
Watch a full walkthrough using our iOS app (it's mostly the same as the site, but a bit outdated with some features).
Jump over to the YouTube page for shortcuts to specific sections of the video.
Creating your account
Signing up is easy, you’ll only need an email address to get started for free. During the sign up process, you will be asked for some physical information about yourself - fill this out based on your most current measurements, not based on your goals.
This data will be used in our calculators and will be saved to your profile, although no one but you
can see it. You’ll enter information about your diet preferences and nutritional requirements on the
next two pages, but all of it can be edited later as needed.
See
Tutorial #1 in our Library for details on updating your goals and preferences
You will have an option to sign up for a free trial of the premium service, but if you want to play around with things first, you can always come back to this screen by clicking "What's in premium?" at the top of the page. Once you’ve finished signing up, you will find yourself at the Diet Planner page – this will serve as the home page whenever you log into Eat This Much.
Don't have an account already? Click here to go to the signup page
Free vs Premium
Eat This Much is a free service with additional features that you can unlock by subscribing.
For free, you can use the single-day diet planner with no restrictions. You can follow any kind of diet you like, block stuff you don't like, create/save as many foods and recipes as you want, and customize the nutrition targets down to the gram. If you end up eating something that isn’t on the plan, you can simply remove the suggested foods and add what you did eat, and then regenerate the remaining meals.
As a subscriber, you unlock the automatic weekly meal generator. This makes it easy to plan ahead of time and get the peace of mind that your next 1-2 weeks of meals is totally taken care of. Our weekly planner algorithms can be optimized to reduce your grocery waste, hit super-specific nutrition targets, get a lot of variety, or a balance of all three. We also give you a grocery list of everything you need, and automatically keep track of what you should still have in your pantry. Then when you're ready to get started, get your groceries delivered or just take list to the store.
The free service will be enough for many people to take control of their diets - any amount of diet tracking will keep you aware of what you’re eating throughout each day. Our premium weekly meal planning service takes things to the next level and makes it easy to turn your dietary goals into a lifelong habit.
The premium service comes with a 14 day free trial and 30 day money back guarantee. Don't pay anything unless you love it.
All of us here at Eat This Much use the planner and it makes feeding ourselves incredibly easy, but even the free account is powerful enough to help you take control of your eating habits with very little effort. Try it out, and upgrade when you're ready!
Interested in reading more about our premium service? Click here for more info
Full list of premium features
- The automatic weekly meal planner - Plan the next week of meals all at once with our most advanced algorithms. Optimized to reduce waste, have lots of variety, hit very specific macros, or a balance of all three (you choose).
- Grocery lists - Automatically generated from your meal plans, update instantly when you make changes.
- Grocery delivery integration - 1 click export your grocery list to Instacart
- Pantry tracking - Move foods from your grocery list to your pantry with one click. We’ll automatically keep track of what you still have as you eat, and repurpose extra ingredients to reduce waste.
- Leftovers planning - The generator will automatically place leftovers in your meal plans. You can customize the patterns to set up leftovers any way you want, from a simple Dinner to next day’s Lunch, to Meal Prep Sunday meals that last throughout the week.
- Alternate meals and recipes based on what you already own in the pantry - List meals based on what you already own, and see a list of recipes you can make in the “Pantry” tab of the sidebar.
- Family meal planning - Set the number of family members on each meal and the grocery list will automatically include enough ingredients for everyone.
- Save up to 20 meal plans.
- Print / email meal plans and grocery lists.
Interested in reading more about our premium service? Click here for more info
Diet Planner
Regenerating meals and foods
When the generator gives you a meal plan, there may be a couple dishes or meals that don’t appeal to
you. We try to make it easy to swap out anything that you don’t want using the shuffle buttons on
each individual meal or food.
See
Tutorial #3 in our Library for a full demonstration on regenerating meals
When you regenerate a food or meal, the generator picks foods that meet whatever nutrition is needed for your total daily nutrition targets. For example, if your nutrition targets are asking for 2000 calories, but your current meal plan only has 1800 calories (maybe you deleted a food or changed a number of servings), if you refresh a meal that has 200 calories, the new suggestion should have around 400 calories, bringing your total up to around 2000 calories.
Refreshing meals doesn't use the “meal size” setting on the Meal Types
Meal and food refreshes will try to "autocomplete" your nutrition targets. The "meal size" setting is only used when generating a new meal plan from scratch, and this flexibilty lets you manually modify one meal, and then regenerate a different meal to have it adjust to your new targets.
Meal Type settings
Each meal has settings that are defined by its Meal Type. Every user account starts with 3 Meal Types: Breakfast, Lunch, and Dinner. There’s nothing special about the names of the meals, but each Meal Type starts with some default settings that should get you started (for example, the Lunch meal type starts with no cook time since you might be at work).
Meal Type settings:
- Available prep time
- If you can or can’t cook
- Meal complexity
- Meal size
- Whether you want breakfast foods or not
- Number of family members
- Whether or not you want the generator to only use Recurring Foods
You can edit these meal types by clicking/tapping on the name of the meal in the Diet Planner. You
can create new meal types, or edit the existing ones. All meals with the same Meal Type share the
same settings, so if you edit one Breakfast meal, it will change the settings for all of the
Breakfasts.
See
Tutorial #6 in our Library for a full demonstration on editing your meal type settings
Favorite foods
Click the heart next to a food to add it to your Favorites list.
Favorite foods will get a small bonus in the algorithms, so favorite things that look appealing to you as they come up in the generator.
You can also quickly access the Favorites list from the Food Bank. On the website, the Food Bank can
be accessed by clicking the “Search foods” button to pop out the sidebar, and in the app, you can
press the “+” button in the top right of the Diet Planner page to open the search.
See
Tutorial #3 in our Library for a full demonstration on favoriting foods
Number of meals per day
There are two ways to change the number of meals on Eat This Much.

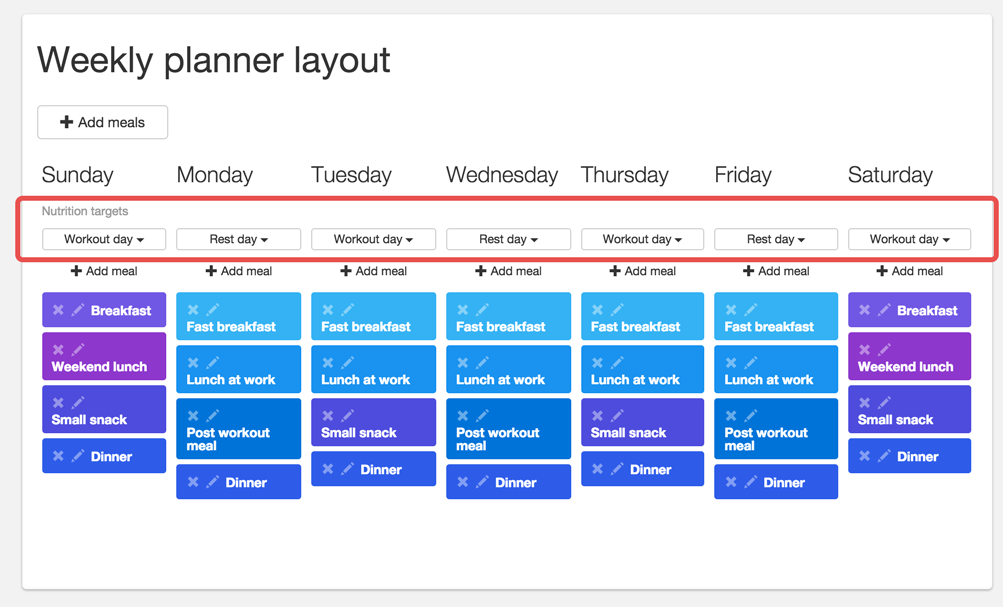
1. If you're using the weekly planner, the easiest way to do this is via the Weekly Layout page.
On the Meal Layout page, you can customize how many meals there are on each day, and even set different meals to appear from day to day (in case you want longer cook time on some days, like for your weekend meals).
Once you set up the layout, to make your meal plans reflect the new layout, go back to the diet planner page and hit "Regenerate entire week...". Select the weeks you want to regenerate, and then they'll match the structure of your Meal Layout templates.
2. The second way to customize the number of meals is directly on the planner.

Changing the number of meals here will only change that specific meal plan. If you regenerate the week, it will go back to reflecting whatever number of meals you have in the Weekly Layout page.
Nutrition Targets
Your nutrition targets can be completely customized to match whatever your goals are.
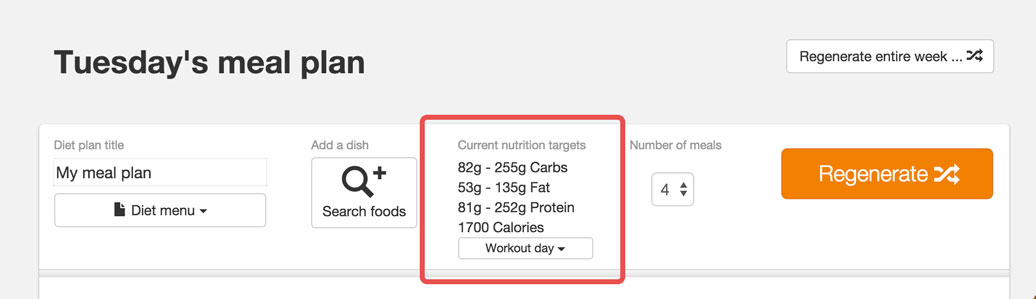
If you want to change your calorie or macronutrient targets (or your fiber, cholesterol, or sodium limits), you need to click the name of your current Nutrition Profile.
Clicking the name of the profile will allow you to edit the profile, or create new ones and switch
between them.
See
Tutorial #2 in our Library for a full demonstration of changing your nutrition targets
If you have a subscription to ETM and you're using the weekly planner, you may also want to give different sets of nutrition targets to each day of the week. You can do this in the Weekly Layout page.
The planner will use your updated settings the next time you regenerate
This is true of most settings that you can change on Eat This Much - we’ll never immediately regenerate your meal plans to avoid erasing out anything that you may have already customized.
Recurring Foods
Recurring Foods give you explicit control over which foods the generator uses when building meal plans. Setting a food to recur "often" will make it appear significantly more than other foods, and setting it to "always" will add it to all plans.
If you want total control over what foods the generator uses for a meal, add a bunch of "often" recurring foods and check the setting on the Meal Type that says “Only use recurring foods in this meal.” Then the generator will only select from whatever foods you’ve added when building it.
If you restrict the meal to recurring foods, the amount of variety you see in that meal reflects the number of recurring foods you add. For example, if you only add 3 or 4 foods, you generator will give you those foods day after day. If you add 10+ foods, the generator will try not to recommend the same recipe two days in a row (unless they're suggested as leftovers).
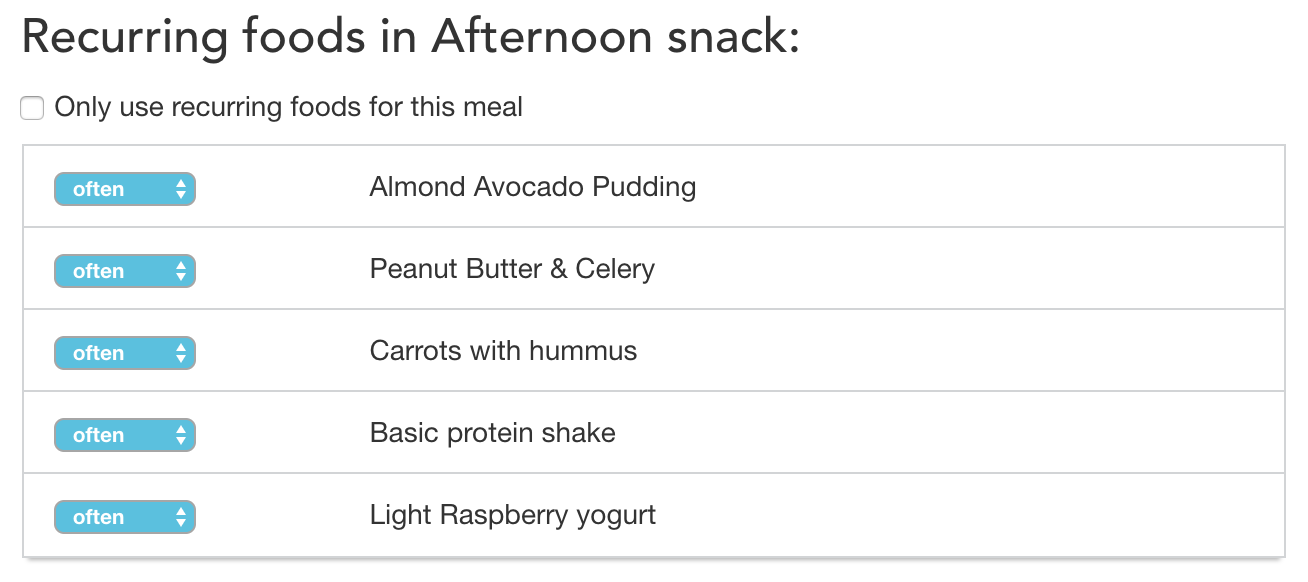
Note If you add a food to be often recurring and you're not
seeing it appear ever, it might be because
its nutrition values just aren't favorable enough to match your nutrition targets. You can try
changing your targets or setting up that food to show up “always”.
See
Tutorial #4 in our Library for a full demonstration on recurring foods
Custom Foods / Custom Recipes
If there’s a food or recipe you want to track that isn’t in our database, you can add it as a Custom Food or Custom Recipe.
A Custom Food is useful if you just want to enter the nutrition values for a food (useful if it came in a package and has the nutrition printed on it). You can then add it to your meal plans and the nutrition will be accounted for in your daily nutrition totals.
A Custom Recipe lets you add a list of ingredients, and the nutrition totals will be automatically calculated. The generator will automatically use your custom recipes when building meal plans.
Note The generator does not automatically use your basic
custom foods when building meal plans, but you
can add it as a Recurring Food, or as an ingredient in a Custom Recipe.
See
Tutorial #5 in our Library for a full demonstration on custom foods
Personalized Recipes
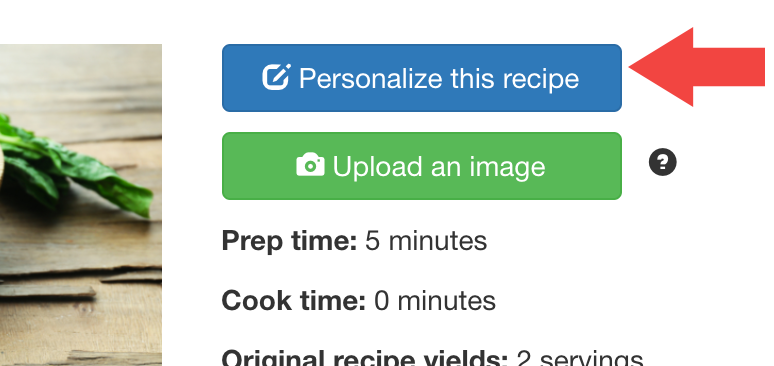
Every recipe can be personalized with the “Personalize Recipe” button on the recipe info page.
When you personalize a recipe, the generator will use your personalized version instead of the original whenever you create a new meal plan.
Note New personalized recipe won’t automatically replace other instances of the original recipe in your existing meal plans, but you can manually swap it out via drag + drop if you like.
Family / couples meal planning
In the Meal Type settings (accessed by clicking on the meal's name in the planner), there’s a
“Family meal” setting that says “Plan this meal for __ people”. By default, every meal will be
planned for 1 person, but you can change this number to automatically scale the recipes up for
multiple people.
See
Tutorial #10 in our Library for a full demonstration on using the Family/Couples meal planning
feature
What does this do?
This changes the amount of ingredients in the grocery list, so if you want some other people to enjoy that meal with you, the grocery list will scale up the ingredients needed for that meal by whatever number you select here. So if you set Lunch to be for 2 people and lunch tells you to eat a single turkey sandwich, your grocery list will contain the ingredients for 2 turkey sandwiches and your weekly meal plan email will tell you to make 2 of them, but only eat 1.
What doesn't this do?
This won't automatically account for differences in nutrition targets for those other people. This is something we want to build eventually, but in the meantime, there are a couple workarounds you can try:
How can I follow the plans with my significant other?
Simplest method:
Set the planner's nutrition targets to match whoever's targets are the lowest of the two of you. So if you want to eat 2200 calories, and your S.O. wants to eat 1800 calories, set the planner's targets for 1800 calories. Set every meal to plan for 2 people (assuming you want to eat mostly the same things), and then you'll need to find an extra 400 calories somewhere (1800 + 400 = 2200). The easiest way to do this is to just have some extra meal that you eat every day that's around 400 calories, like a small sandwich or protein shake.
This works best if your calorie difference isn't huge, and you don't mind keeping your meal with the extra calories consistent. If you want to track those extra calories, flip the targets around. Set the planner to target your 2200 calories, and then set your foods to recur "always" in a meal that only uses those recurring foods.
Less simple method:You can also try adding together your calorie targets with the other person, and then dividing the meals by the proportion of calories you each need. So if you want to eat 3000 calories and your significant other only wants 1500 calories (maybe you're trying to get huge and you S.O. wants to get cut), tell the generator you want 4500 calories and split the meals in a 2:1 ratio. This can get a little complicated if your calories don't divide into a nice, even ratio, so I generally recommend the first method. If you follow this method, you'll want to make sure each meal is set to plan for 1 person, since the calorie targets already account for both people.
The Weekly Meal Planner
Our weekly meal planning algorithms are significantly more advanced than our single-day planner, and the main benefit of signing up for our premium service. As it generates your meal plans, it takes into account what your final grocery list looks like to reduce waste as much as possible, and also ensure some variety from day to day.
The weekly generator will automatically run once a week, the day before your grocery shopping day. This should give you some time to review the plans and make sure everything looks appealing, and then go grocery shopping the next day (the first day of meal plans will start the day after your grocery shopping day). If you want more time to review your meal plans before the grocery shopping day, you can manually regenerate the next week at any time during the previous week when you click the “Regenerate entire week…” button.
The automatic weekly planner also allows for leftovers to be carried over from one day to the next (or later in the same day).
Can I generate two weeks of meals plans?
Many people want to shop for two weeks of meals at a time. We don’t officially support this (yet), but there’s one workaround you can try:
Our weekly planner always allows you to generate the week after your current week of plans. So on the first day of your week’s meal plans (if you want it to be today, change your grocery shopping day to be yesterday), you’ll be able to generate the next two weeks. Select the “Regenerate entire week…” button, and then in the popup, select both weeks and regenerate.
Once it’s finished generating, go to the Groceries page, and make sure your “Synced” days line up with the dates you want to shop (if they don’t, hit “Reset groceries” and choose the correct dates).
Grocery List / Pantry
Syncing the Grocery List
Whenever you view the grocery list, it will automatically sync to match your meal plans. This ensures that your grocery list is always up to date with any changes that you may have made to your plans.
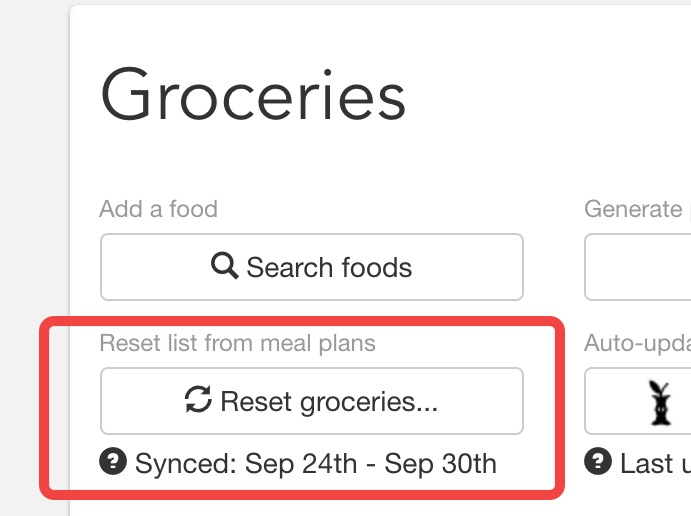
Before you go grocery shopping, double check that your sync dates are matched up the meal plans that you want to shop for.
You can also make manual edits to the items in your grocery list. If you manually add a food from the sidebar, change the amount on a food, or delete a food from the list, that food will no longer be automatically updated to match your plans until you reset the grocery list (or the weekly planner automatically runs before your grocery shopping day).
Is your grocrey list missing foods?
It’s important to emphasize what was just mentioned above - if you delete a food from your grocery list, it will no longer be automatically synced with your plans to avoid re-adding that food. So if you think a food is missing from your grocery list that should be there, you may have accidentally deleted it earlier. Try resetting the grocery list to see if it reappears, and if not, let us know at [email protected] (we try to be quick to fix grocery list issues :)
Pantry tracking
Every week, your grocery list will show you exactly how much of each ingredient is needed to follow the meal plans. After you go grocery shopping, move the stuff you bought from the grocery list to the pantry.
The ingredient amounts we ask you to buy reflect the quantity used in the plan, so if you want the Pantry to have a totally accurate record, you can adjust the amount in the pantry to match the package size you picked out (we're working on getting accurate package size data so this happens automatically).
Foods will be removed from the pantry the day after you're supposed to have eaten them (either automatically when the weekly generator runs, or if you hit the "update pantry" button on the grocery list page). If things don’t go according to plan, add or remove foods from the meals in your plan, and when the pantry updates it will deduct ingredients accordingly.
The weekly planner will give priority to using up your pantry foods to reduce waste. During testing, we've found the planner to be 80%-90% efficient with using up groceries, and the average American is about 70% efficient with grocery usage. We're working on adding more data to our grocery items, but if you're anything like me, the planner will already do a significantly better job of using everything up.
Can the generator create meals using only the foods in my pantry?
Sort of - the weekly planner will place some emphasis on using up your pantry foods, but you'll likely still need to go grocery shopping to follow the plans completely. You can tell the generator to focus on efficient grocery usage which will give even more priority to pantry foods.
If you want the generator to use only your pantry foods, you can generate one meal at a time by clicking the "More" -> "List alternative meals" button next to each meal (web version only for now). There, you can choose to show which meals you can make with your pantry. You can also browse recipes that can be made using your pantry, in the Food Bank -> Pantry tab. Then just drag + drop these recipes into your plan or add them as Recurring Foods.
If you want total control of what the planner recommends, there's always the Recurring Foods feature. Find the foods + recipes you want in the Food Bank, then add them as Recurring Foods that recur "often", and then select the checkbox for those meals that says "Only use recurring foods for this meal". This will force the generator to use only the small subset of foods you already own.
Printing / emailing your grocery list
You can generate a printable version of your meal plans and grocery lists (together or separately), and then choose to either print it or email it to yourself.
We also offer a “Condensed” version of both your meal plans and grocery lists that don’t show images in case you need to save paper. When you click the “Print/email” button (you can find it on the Groceries page, or in the “Diet actions” of the Diet Planner page), there’s a checkbox to use the condensed version.
If you’d like to get a .pdf file of your meal plans or grocery lists, choose the print option and use your browser’s print function to create a pdf (Chome can do this, as well as the default OS X print window).
Grocery delivery
We’ve partnered with Instacart to offer 1-click exporting of your grocery list to their grocery delivery service - you can plan out your entire week’s meals in minutes with Eat This Much, and then get it all delivered by Instacart in as little as an hour.
To do this, just click the “Order with Instacart” button on the grocery list page, and then export your grocery list (technically 2 clicks). This will send you to Instacart where you can pick the grocery store item for each ingredient in your grocery list, and then get everything sent to your door.
Settings
Food Preferences
- Choose a preset diet type (e.g. Paleo, Vegan, Mediterranean, etc).
- Get suggested macronutrient targets to match the diet type
- Select if you want to allow any ingredient substitutions that cater to specific diet styles
- Customize keyword filters that exclude foods from your meal suggestions
- Paleo - The paleo diet suggests that you eat only what a person in a hunter-gatherer society would eat. This is a roundabout way of cutting out processed foods and many sources of carbs.
- Ketogenic - The atkins diet involves eating few enough carbs to put your body into ketosis, where you use fats as your primary energy source.
- Vegetarian - The vegetarian diet will cut out meats from your meal plans.
- Vegan - The vegan diet will cut out all animal products from your meal plans.
- Mediterranean - The Mediterranean diet is inspired by the dietary patterns of Mediterranean cultures. It focuses on consumption of fruits, vegetables, fish, some dairy, and few meats. The generator does not portion your foods as specifically as a strict mediterranean diet suggests, but it will cut many of the restricted foods.
The preset diet setting only does two things. First, it adds some keyword filters to the “I don’t want to eat” section. This is no different than if you added those keywords yourself. You can select suggested keywords, or type them in with your keyboard - if a recipe matches the keyword with its ingredients or name, it won’t be suggested in your plans.
The second thing a preset diet does is change what your suggested macronutrient targets are. The
calorie target is based on the
Mifflin St. Jeor equation,
but the macro targets are relatively loose
ranges that still satisfy the suggestions given by the diet style.
See
Tutorial #1 in our Library for a full demonstration on updating your food preferences
Want to follow a diet type that isn't listed here?
ETM can be configured to cater to most diet types. Since the preset diet only changes the food exclusions and nutrition recommendations, feel free to set your preset diet to "anything" and configure the settings however you like.
If the diet you're trying to follow enforces things like specific meal timings and certain amounts of each food in each meal, you'll probably have to do some manual configuration, but keep in mind that worrying about timing your meals will have relatively little impact on your results, and can be counterproductive to your success. (see our Nutrition References section for more information).
Meal Layout
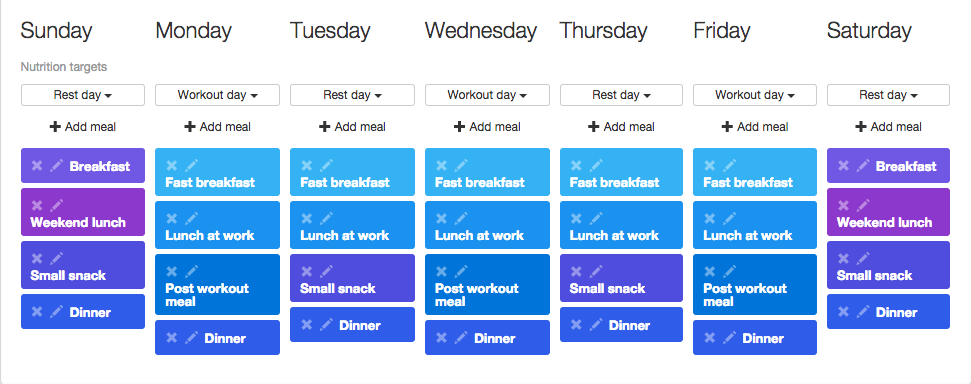
The Meal Layout determines the which set of meals and which nutrition profiles get used on each day of the week. You can create different meal types for each day of the week to more closely fit your schedule, like a "Sunday breakfast" with more cook time.
You can also set different nutrition targets on each day of the week, like a “Workout day” nutrition profile with a higher calorie and protein intake, and a “Rest day” nutrition profile with a lower calorie intake.
Changing the Meal Layout won’t modify your existing meal plans
If you’d like to reset your existing meal plans, either regenerate the entire week (this will reset all of the plans within the week), or select “Delete diet” from the “Diet actions” on the Diet Planner page to reset individual meal plans.
Leftovers
Leftovers are one of those obvious but still underrated strategies of successful eater, since you can quickly reheat a meal when you would otherwise not have time to cook. It also adds a little redundancy to the foods in your weekly meal plan, and this will help reduce the length of your grocery list. If you don't like leftovers, don't worry - you can switch them on or off from the Leftovers page in your settings.
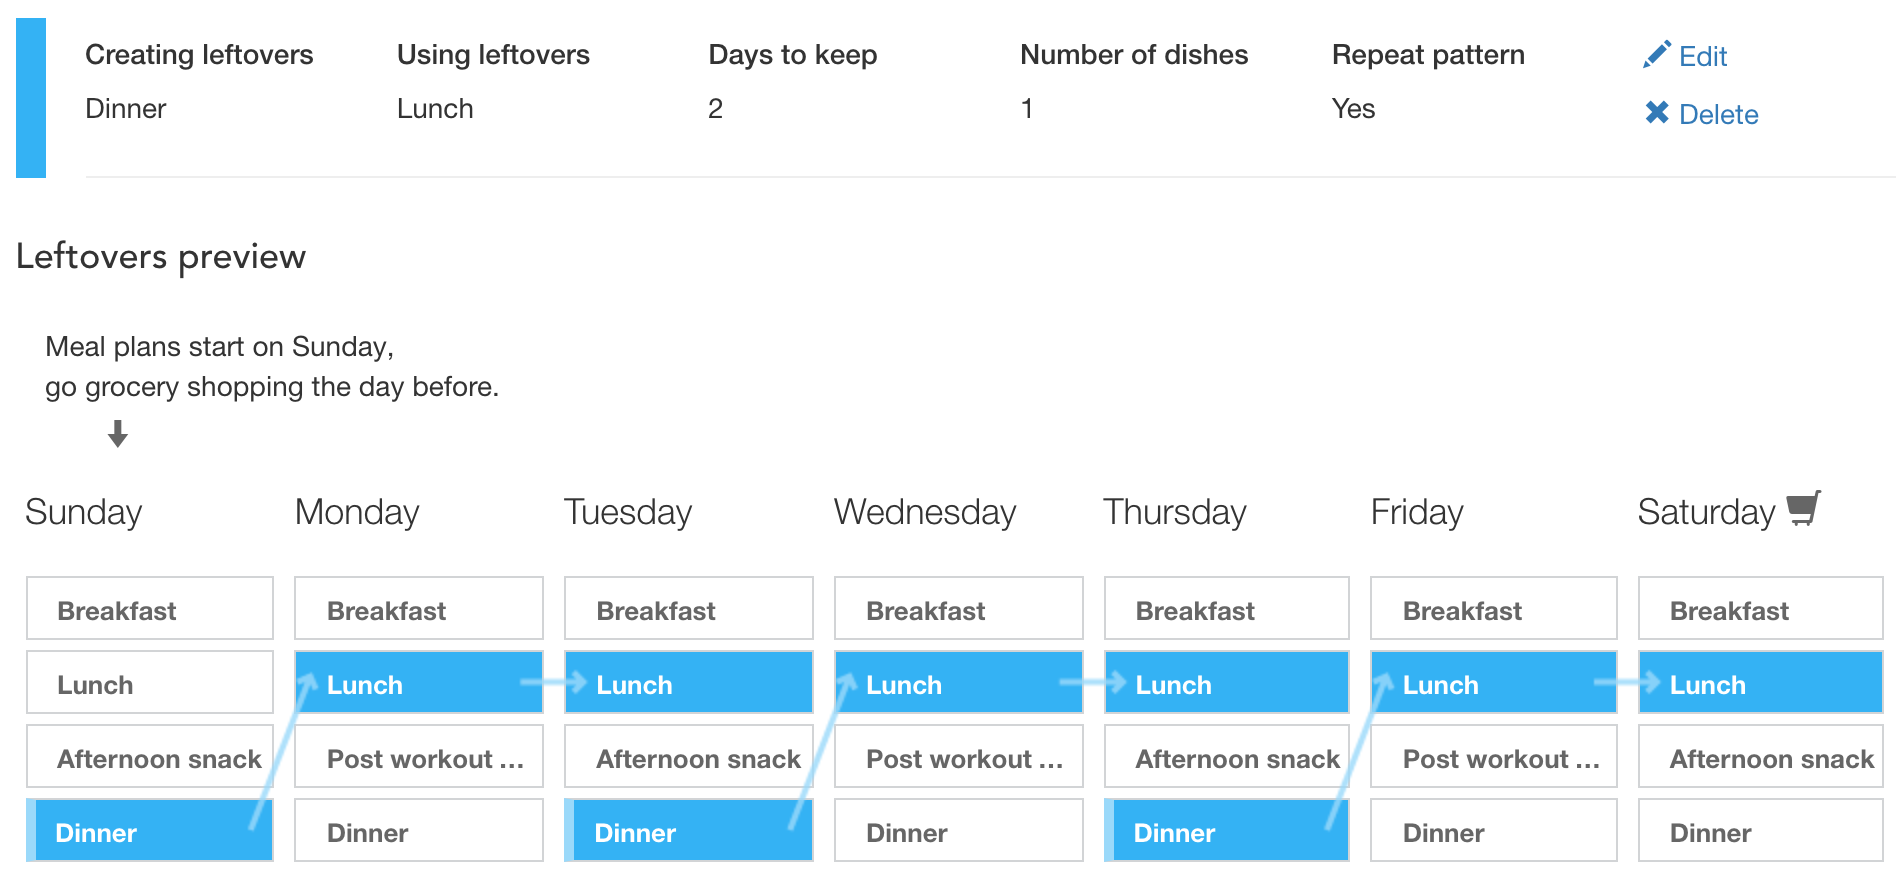
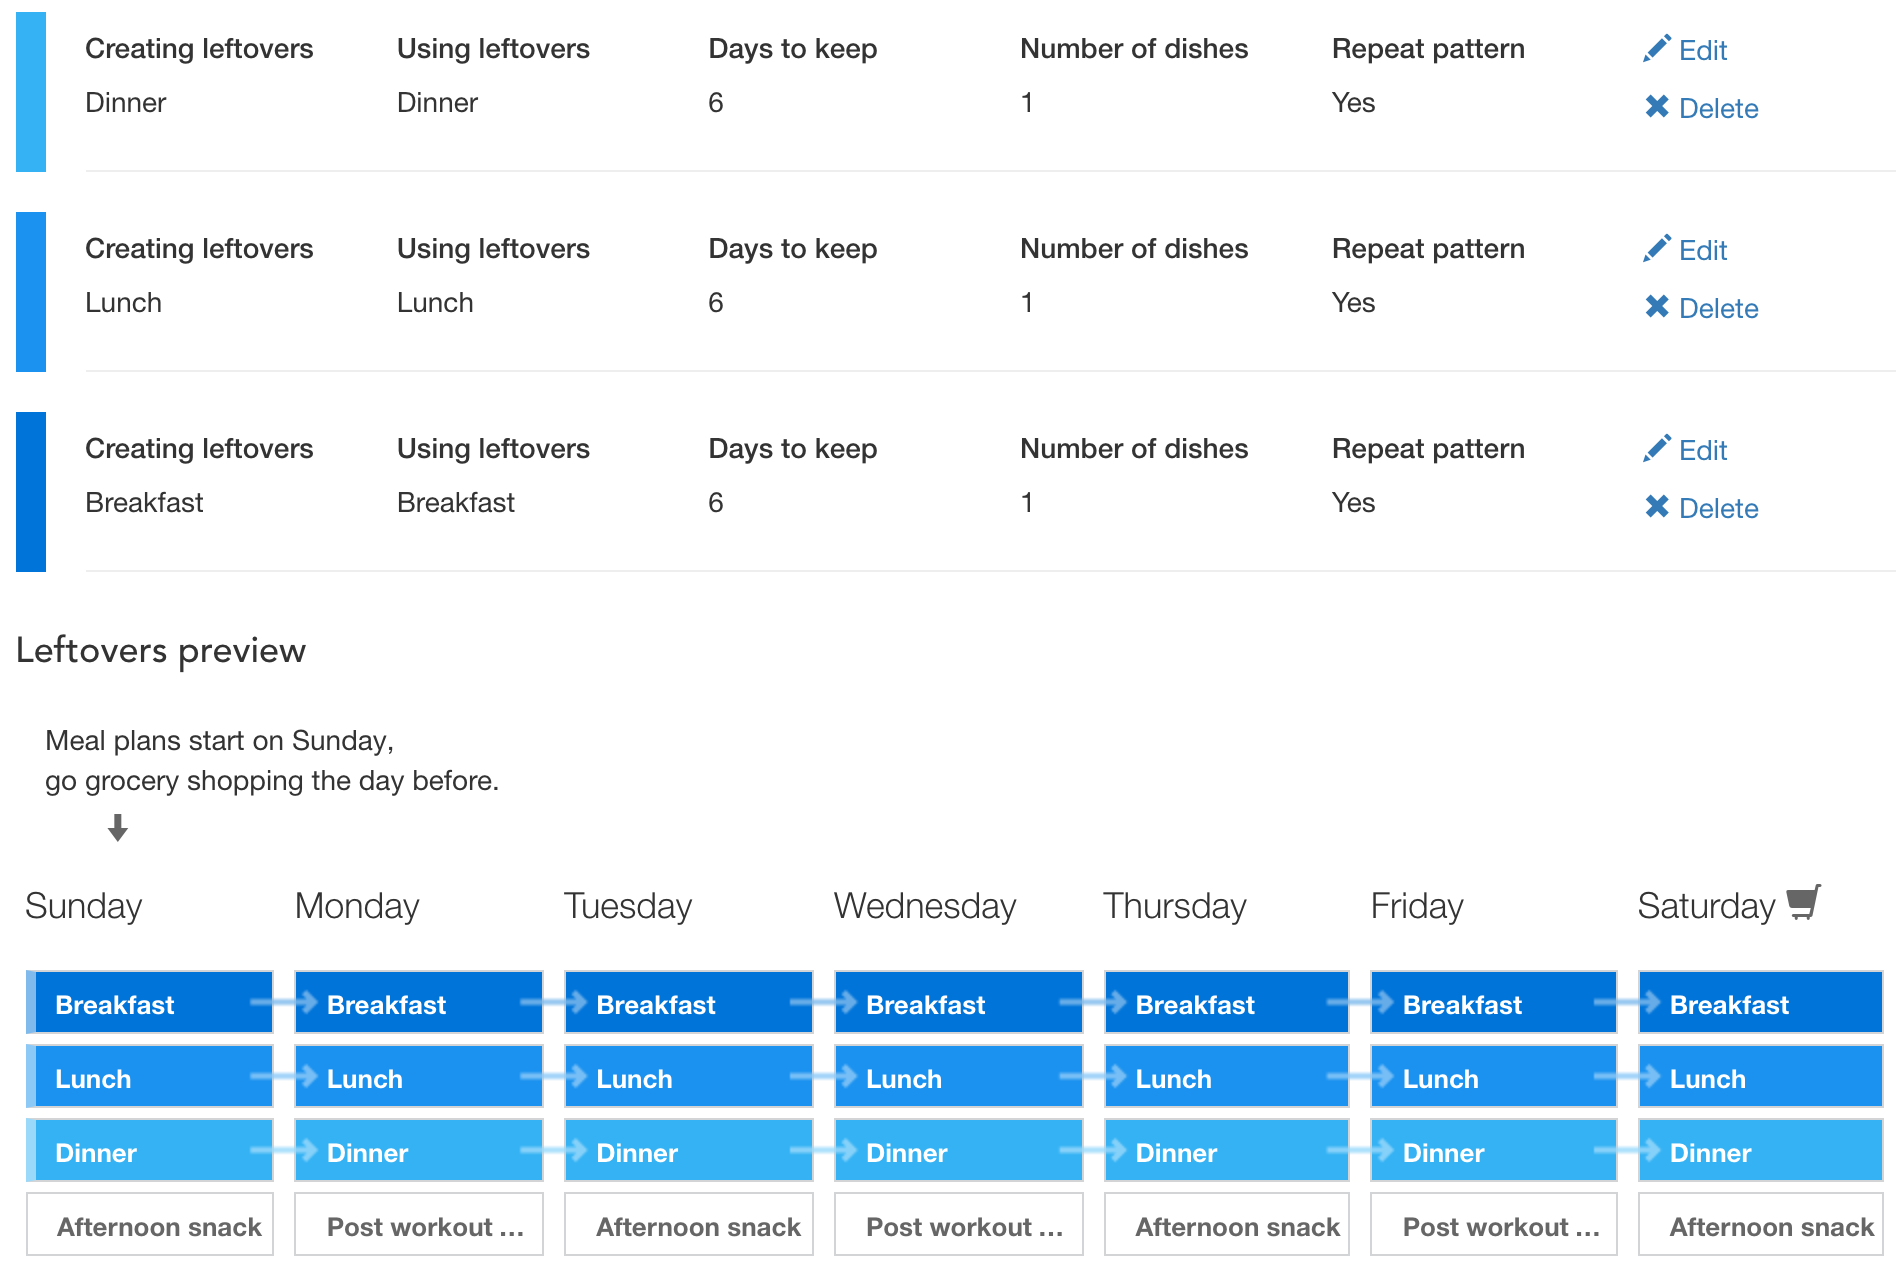
To customize leftovers, you create “Leftovers Patterns”. This lets you select a Meal Type to create leftovers in the week, and which Meal Types consume leftovers. You then choose how many days you want the leftovers to be kept, and then they will be placed in every leftovers-consuming meal within those days. As you change the settings, a "Leftovers preview" will update to show you how the dishes will appear in your plan.
When you refresh individual leftovers items in the meal plan, it will refresh all of the linked leftovers items. If you refresh a day or meal that contains leftovers, the leftovers dish will only change if it's the original dish that creates leftovers.
Here are a few example leftovers setups, but feel free to get creative:
Simple setup, Dinner gets saved for the next 2 lunches
Meal Prep Sunday, Breakfast/Lunch/Dinner make enough for the whole week
Tip If you’re having trouble getting the planner to give you a leftovers item you like, you can also manually place the leftovers. Simply find the recipe you want from the Food Bank, add it to your plan, and then select the “Create leftovers” button from the Recipe info screen. (web only for now)
Meal settings
Meal settings can be adjusted by editing the Meal Types - this is where most of the customization takes place to determine which foods show up in your meals. We're planning to add a dedicated page to edit Meal Types, but in the meantime, you can edit them by clicking on the meal's name directly in the Diet Planner.
Jump to the section on Meal Types
Nutrition Profiles
Nutrition Profiles contain a set of nutrition targets, which includes targets for primarily Calories, grams of carbs, fat, and protein. It also includes targets for minimum fiber, and maximum sodium and cholesterol (though these are given less priority).
We're planning to add a dedicated page to edit Nutrition Profiles, but in the meantime, you can edit them directly in your meal plan under "Current Targets", or on the Meal Layout page.
Jump to the section on Nutrition Targets
User Profile
The User Profile page stores most of your physical profile information that you entered during signup. We use this information to help estimate your dietary requirements from the Nutrition Calculator.
Notable User Profile fields
Imperial / Metric units: This will determine what units get used when displaying some foods. If you choose Metric, basic foods will be displayed with their gram weight as opposed to cups or ounces. We plan to add metric volume units at some point in the future.
Grocery shopping day: This is basically a way to select when your week starts, and affects two things. First, your weekly meal plans start the day after you go grocery shopping. Second, the weekly planner will run automatically and send you your meal plans via email the day before your grocery shopping day. This gives you some time to make changes before shopping (premium only).
Bodyfat: We use this to help estimate your lean body mass, and from this, your recommended protein intake. Lower body fat means a higher lean body mass, and a higher protein recommendation.
If you need help estimating your bodyfat, here’s a chart you can use:
Men -
See bodyfat examples for men
Women -
See bodyfat examples for women
Activity level: This has a very large effect on your recommended calorie intake. Be careful not to overestimate your activity! If you work a desk job and sit most of the day, even if you work out a few days a week, you should probably put “Sedentary” as your choice. If you’re not sure, it’s better to err in the direction of your goals, so select less activity than you think if you’re trying to lose weight (and if you’re trying to gain weight/build muscle, only overestimate if you’re otherwise having trouble gaining).
Nutrition Calculator
The nutrition calculator can help you estimate your dietary requirements. It uses the information from your User Profile to generate calorie and macronutrient targets that should help you meet your goals, while also getting a good amount of variety from the meal generator.
Estimating your calorie targets
Our calorie calculator uses the Mifflin St. Jeor equation, an equation for estimating Basal Metabolic Rate (BMR).
The equation is as follows:
Where ‘s’ is a constant, +5 for males and −161 for females.
Once we have the BMR, we factor in your selected activity level and weight goal. If you select that you want to lose weight, we suggest a 20% calorie deficit, and if you want to gain, we suggest a 15% surplus. This is a conservative amount, and another popular method is to simply add or subtract 500 calories to your targets depending on your goals.
Our macronutrient recommendations are a combination of your weight goals and diet type (we try to only suggest reasonable numbers for your given diet type, e.g. lower protein for a vegan diet, or lower carbs for a keto/paleo diet). We also suggest fairly loose ranges, because this allows for significantly better variety in your meals. Most people will do okay with a lot of variance in their macronutrient intake, but feel free to customize these numbers to be as specific as you want.
Feel free to use other calculators to estimate your nutrition targets, and then plug those numbers into your Nutrition Profile. However, keep in mind that any calculator can only give you a rough estimation, and the best way to figure out your ideal targets is to try them out, see how you feel (and if you lose/gain weight), and then adjust accordingly.
Note If you select that you want to gain weight, make sure you are also exercising enough! Preferably lifting weights if you want to build muscle. Otherwise, your weight gain will be mostly fat.
Saved meal plans
If you have a meal plan you really like, and want to refer back to it later (or copy it to other days of the week), you can save meal plans to your profile.
If you’re on the website, to save a plan, go to the main Diet Planner page, then select the “Diet Menu” from the top left of the meal plan, and “Save to profile”. Then you can use the “Load from profile” to load that meal plan into other days of the week. This works like a "copy & paste" for your meal plans.
To view a list of your saved meal plans, go to Settings -> Saved plans. You can view your saved plans individually as well.
Free users can have 1 saved meal plan, and premium users can have up to 20 meal plans.
Sharing meal plans
Saving meal plans also allows you to share them. From your list of saved meal plans, select View to open it, and then you can copy and paste the link from your browser to share it with anyone.
Your saved meal plans also act as a friend referral link. If you send someone one of your meal plans, and then they sign up for a premium account, you both get a free month of premium (as $15 credit to your account).
Reset your account
If you feel like you need to start from scratch, here's what to do. We don't have a "Reset account" button, but there are only a few places in the app that you need to look at to get back to square one.
- User profile - This is the first thing you set up when creating an account, and you can find it in the Settings section. Keep this up to date if you want the calorie calculator to make relevant nutrition suggestions.
- Nutrition profile - By default, this is called "My Nutrition Targets". It defines your nutrition targets for the day, and you can find it in the Planner view, or in the Meal Layout page. To reset the targets based on our nutrition calculator, there's a button to open the calculator inside of the nutrition profile editor. You can use the estimated targets, or customize them to be whatever you want.
- Food Preferences - To get back to square one and have the most variety possible, set your preferred diet type to "Anything" and clear out the keywords in the "I don't want to eat" section. Then add things back in until they fit your preferences.
- Meal Types - To edit or change meals, just click the name of the meal in your Planner. When you sign up, we automatically create a Breakfast, Lunch, Dinner, and Snack meal type, but there's nothing special about these. You can create as many new meal types as you want and give them each custom preferences.
- Weekly Planner Layout - (subscribers only) This is where you decide which meals are selected for each day of the week, and which nutrition profile is used for each day.
Once you have your settings back to where you want them, remember that we don't automatically reset your existing meal plans to avoid destroying and customizations you may have done. To get new meal plans that match your preferences, simply hit the Regenerate button.
Friend referral program
If you like using Eat This Much, maybe your friends and family will too! The friend referral program currently only works if you sign up through the website, but once you do, you can use your account in the mobile apps as well.
To invite your friends, simply send them your referral link, which you can find in Settings -> Invite. The referral link is in the format of https://www.eatthismuch.com/a/your_username.
Once your friend signs up, you'll both get $15 in credit applied to your accounts. On the monthly subscription, this equals a free month, and on the annual subscription, this discounts $15 from the membership price.
You can also send your friends a link to one of your saved meal plans, and that will also act as a referral.
Frequently Asked Questions
I missed my grocery shopping day. How can I get back on track?
This is simple - just visit the grocery list page and resync the grocery list for the rest of the current week. Then start following the meal plans as soon as you can.
If you miss your grocery shopping day, you might have also missed a few days of the meal plan. Remember to delete stuff you don't eat and add what you do so that the planner knows what to remove from the virtual pantry. Don't worry about telling the planner you ate foods that you never had in the pantry - it will ignore whatever it's not already keeping track of.
How do I prevent a specific meal or day from generating?
To block out a specific day
If you regularly travel and want to exclude a specific day from the weekly plan, simply remove all of the meals from that day in the "Meal Layout" section of the settings. On the road every Saturday? Delete all of Saturday's meals. (This is specific to the subscription weekly planner). To remove just one meal, create a nutrition profile with the calories for that meal subtracted, change the desired day(s) in the Meal Layout to use that profile, and then delete the meal from those days.
If you're not traveling regularly but know you're going to be somewhere with unpredictable meals next week, it's probably easier to just delete those days from your diet planner after they've been generated. Just use the calendar to navigate to the days you'll be traveling, click the "Diet menu" button (next to the "Search foods" button), and select "Delete this diet".
To block out a specific meal
Maybe you eat out for lunch every workday and don't know what you're going to have - you just want the diet planner to fill in the gaps in the meals you're more in control of, like breakfast and dinner. Unlike removing a day from the Meal Layout, you can't just remove a meal from the day because the generator will still try to meet your nutrition targets by adding more calories to your remaining meals.
The solution is to estimate the nutrition you think you're going to have for that meal so that the generator will correctly compensate in the rest of the meals. Either create a "custom food" with the estimated nutrition, or if you commonly eat at a specific restaurant, try looking up what you order in our database and adding it as an "always" recurring food. Then if you don't end up eating that thing, swap it out afterwards to keep accurate track of your intake.